Welcome to the vibrant world of composting—nature’s own recycling process! If you’re embarking on a journey towards sustainable gardening and want to start building fertile soil, composting should be a cornerstone of your practice. This in-depth guide is created especially for beginners like you, curious to explore the magic that unfolds when organic waste transforms into rich compost. We’ll dive deep into why composting is essential for gardens, the simple steps to start your own compost pile, and how finished compost supports soil life, structure, fertility, and resilience naturally.
So… What Exactly Is Compost?
You’ve likely heard the term tossed around, but what is compost, really? At its core, compost is decomposed organic matter—think food scraps, dried leaves, grass clippings, and garden debris—that breaks down into a rich, earthy material you can mix into soil.
This breakdown process happens thanks to microorganisms, worms, fungi, and oxygen—all working together to transform waste into humus (the good kind of dirt). It’s the same process nature uses in forests, where fallen leaves and plant debris feed the soil for future growth. Composting at home just accelerates and controls the process a bit more intentionally.
The Science of Composting: Transforming Waste into Nutrients
Composting is the natural process of decomposition where microorganisms break down organic matter like kitchen scraps, garden waste, and paper products into a nutrient-rich soil amendment. It’s a simple, yet profound biological cycle that not only reduces waste but also enriches your garden soil. By turning what many consider trash into a treasured resource, composting supports life, enhances soil moisture, and reduces the need for chemical fertilizers.
Understanding the Basics of Composting
To harness the benefits of composting, it’s important to understand the key components and conditions required to facilitate this natural process effectively.
- Carbon and Nitrogen Balance: A successful compost pile depends on the right balance of carbon-rich (browns) and nitrogen-rich (greens) materials. Browns include dried leaves, straw, and newspaper, while greens are typically fresh grass clippings, fruit scraps, and vegetable trimmings.
- Moisture: Your compost should be moist, akin to a damp sponge. Too dry, and the decomposition will stall; too wet, and it can lead to odor issues.
- Airflow: Oxygen is critical for aerobic bacteria responsible for breaking down the organic material. Turning your compost pile regularly can ensure adequate airflow.
- Particle Size: Smaller pieces break down faster, so chopping or shredding materials can expedite the composting process.
What the brown-to-green ratio is actually measuring. You’ll see “2 parts brown to 1 part green” everywhere, including below — and it’s good practical advice. But it’s a rough proxy for the thing that really matters, which is the carbon-to-nitrogen ratio. Microbes work best somewhere around 25:1 to 40:1 carbon to nitrogen.
That’s worth knowing because it explains every problem you’ll ever have with a pile. Too much nitrogen (too many greens) and the excess comes off as ammonia — that’s the smell. Too much carbon (too many browns) and the microbes run out of the nitrogen they need to multiply, so the pile just sits there. Once you understand that, you stop following a rule and start reading your pile.
Why Start a Compost Bin? The Benefits Are Plentiful
Composting is a triple-win: for your garden, your wallet, and the planet.
Here’s what makes it so powerful:
- Reduces Waste: According to EPA figures, food made up over 21% of municipal solid waste generated, and yard trimmings about another 12%. That’s roughly a third of what gets thrown away, and nearly all of it could be composted instead.
- Improves Soil Health: Compost feeds your soil with essential nutrients and encourages beneficial microbes that help break down organic material and improve water retention.
- Protects the Planet: Skip synthetic fertilizers, which can leach into water sources and harm ecosystems. Compost is natural, gentle, and full of life.
- Boosts Plant Growth: Healthier soil means stronger, more resilient plants with deeper roots, brighter blooms, and more abundant harvests.
How Composting Works
Nature’s already a pro at decomposition—you just need to provide the right environment for it to do its thing. Here’s the basic breakdown:
- Choose a Compost Spot: This can be a bin, tumbler, or an open pile. Whatever works for your space!
- Add Your Waste: Alternate between green materials (wet, nitrogen-rich) and brown materials (dry, carbon-rich).
- Keep It Moist (But Not Soaked): A damp sponge is the goal.
- Turn It Occasionally: Stirring the pile introduces oxygen and speeds things up.
- Wait for the Magic: In time, your pile transforms into dark, crumbly compost ready to mix into your soil.
Compost Ingredients: What to Use (and Avoid)
Composting success is all about balance—roughly 2 parts brown to 1 part green is the golden ratio.
Brown Materials (Carbon-Rich — 2/3 of pile)
- Dried leaves
- Straw or hay
- Shredded newspaper or paper towels (unbleached)
- Sawdust (from untreated wood)
- Twigs and wood chips
- Dead garden plants
Green Materials (Nitrogen-Rich — 1/3 of pile)
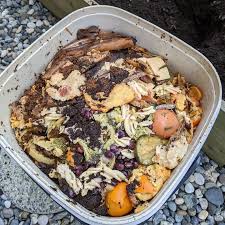
- Fruit and veggie scraps
- Coffee grounds and filters
- Fresh grass clippings
- Tea leaves and bags (check for plastic-free bags)
- Eggshells (crushed)
- Manure (herbivore only—cow, chicken, rabbit, horse)
Avoid Composting
- Meat, bones, fish
- Dairy products
- Grease or cooking oil
- Pet waste (from dogs/cats)
- Diseased plants
- Weeds with seeds
- Glossy or coated paper
- Treated wood shavings
Why that list says what it says
Worth understanding, because two of those items are conditional rather than absolute:
- Meat, bones, fish, dairy, grease — these do break down, but slowly, smellily, and they bring rats. This is a practical rule, not a chemical one.
- Dog and cat waste — carnivore manure can carry parasites that survive home composting. Herbivore manure is fine, which is why cow, chicken, rabbit and horse are on the greens list.
- Diseased plants and seeded weeds — these are the conditional ones. A pile that genuinely gets hot enough handles both; a cool pile does not, and will happily spread whatever you put in it around your garden next spring. See the temperature section below before you decide.
- Glossy paper and treated wood — coatings and preservatives you don’t want in food soil.
Setting Up Your First Compost Pile
You don’t need a fancy setup to start composting—just a little space and a few key steps.
- Pick the Right Spot: Choose a well-draining area with partial shade. Keep it away from water sources and curious pets.
- Start With a Base Layer: Lay down a few inches of straw, sticks, or dry leaves to create airflow from the bottom up.
- Layer Green and Brown: Alternate as you build your pile, always ending with brown to deter pests and odors.
- Keep It Covered: A tarp, old carpet, or lid can help retain heat and moisture while keeping critters out.
- Turn It Regularly: Every couple of weeks, give your pile a good mix with a shovel or pitchfork to speed up the breakdown process.
- Watch the Moisture: If your pile’s too dry, sprinkle water. Too wet? Add more browns like leaves or shredded cardboard.
Different Composting Methods to Explore
Depending on your space, climate, and interest level, there’s a composting method for you:
1. Hot Composting (Fast & Efficient)
Want rich compost in just a few weeks? Hot composting is the way to go. It involves carefully balancing green and brown inputs and turning the pile regularly to maintain internal temperatures in the thermophilic range — NC State Extension puts that at roughly 120–150 °F in the centre of the pile. Great for experienced gardeners or those in warmer climates. You’ll need a compost thermometer, a pile of decent size, and the willingness to turn it often.
2. No-Turn Composting (Low Maintenance)
If you prefer a hands-off approach, this method lets nature handle it. Just layer materials and include coarse, chunky browns like straw or sticks to help with airflow. Turn it only occasionally (or not at all!) and harvest finished compost from the bottom over time.
3. Leaf Mold Compost (For Fall Leaves)
Got heaps of leaves each autumn? Pile them up with occasional soil or compost layers in a shady corner. In about 6–12 months, you’ll have a dark, crumbly leaf mold—an excellent amendment that boosts water retention and soil structure.
4. Enclosed Composting Bin (Tidy & Contained)
Perfect for smaller yards or urban settings, enclosed bins keep composting clean and pest-free. Stationary bins are simple containers with ventilation, while tumblers make turning your compost as easy as spinning a barrel. Tumblers tend to break down materials faster but hold less volume.
Two more worth knowing about if neither of those fits: worm composting handles kitchen scraps indoors or on a balcony, and bokashi ferments waste in a sealed bucket — including the meat and dairy a normal pile can’t take.
Temperature: what it kills, and what it doesn’t
This is the part that decides whether you can compost diseased plants and seeded weeds — and almost no guide gives you the actual numbers.
| Temperature | What happens |
|---|---|
| Below about 120 °F | Decomposition still works, just slowly. This is ordinary cold composting and it’s perfectly fine — it just won’t sanitise anything |
| 131 °F held for 3 days | The threshold where pathogens are destroyed. This is the standard the National Organic Program requires — not a rule of thumb, an actual specification |
| Above 145 °F | Weed seeds and fly larvae are killed |
| Above about 150 °F | Too hot. You start killing the beneficial organisms doing the work. Turn the pile to cool it |
The practical upshot. If you are not measuring your pile’s temperature with a thermometer, assume it is not reaching these thresholds — most home piles don’t, especially small ones and anything turned infrequently. Which means: keep diseased plants and seeded weeds out, exactly as the list above says.
If you are running a genuinely hot pile and checking it, you can compost both. The temperature has to reach the whole pile though, not just the centre, so turn the outside material in and let it come back up to temperature before you count it.
Pro Tips for Composting Success
To keep your pile thriving and odor-free, follow these best practices:
- Stick to the 2:1 brown-to-green ratio for optimal airflow and odor control.
- Chop up larger scraps before tossing them in to help them break down faster.
- Bury fresh food waste under a layer of brown material to deter fruit flies and pests.
- Add activators like aged manure, comfrey, or even finished compost to kickstart microbial activity.
- Troubleshoot smells with extra brown materials and a good turn — see the table below for what each smell is telling you.
One piece of common advice to skip: don’t add lime to fix a smell. It’s recommended everywhere, and it backfires. Lime raises the pH, which converts ammonium in the pile into ammonia gas — so you lose nitrogen you wanted to keep, and in the short term the pile often smells worse. Add browns and turn it instead. That fixes the actual cause.
Troubleshooting: what your pile is telling you
| Symptom | What’s wrong | Fix |
|---|---|---|
| Smells like ammonia | Too much nitrogen — too many greens | Add browns and mix them through. Dry leaves, shredded cardboard, straw |
| Smells rotten or like sulphur | Anaerobic — too wet and airless | Turn it thoroughly and add coarse browns to open it up. Cover it if rain is getting in |
| Nothing is happening at all | Too dry, too small, or too much carbon | Check moisture first — squeeze a handful; it should feel like a wrung-out sponge. Then add greens. A pile under about a cubic yard struggles to heat at all |
| Soggy and compacted | Too much water, not enough structure | Add dry browns, turn, and cover. Sticks and straw give it a skeleton |
| Fruit flies | Exposed food scraps | Bury fresh scraps under 6 inches of browns and finish every addition with a brown layer |
| Rats or raccoons | Something is in there that shouldn’t be | Usually meat, dairy or grease. Switch to an enclosed bin or tumbler if it continues |
| Hot for a week, then cold | Normal — the easy material is used up | Turn it. Reintroducing oxygen and mixing in unbroken material usually restarts it |
| White fuzzy growth through it | Fungal mycelium | Nothing — that’s a healthy pile doing its job |
How long will it take?
- Hot composting, turned regularly: a few weeks to a couple of months
- A tumbler: roughly 1–3 months, faster in warm weather
- An ordinary turned pile: 3–6 months
- No-turn composting: 6–12 months, and worth every bit of the wait for the effort you didn’t spend
- Leaf mould: 6–12 months, longer for oak and beech
Cold weather pauses nearly all of it. A pile that looks dead in January is usually just asleep.
How to tell it’s finished, and how to use it
Finished compost is dark, crumbly, and smells like a forest floor. You shouldn’t be able to identify what went into it — if you can still see eggshells and twigs, give it longer. It should also be at ambient temperature and no longer shrinking.
When it’s ready, use a mesh screen to sift out larger pieces, which can go straight back into the bin for further decomposition. Then:
- Spread 2–3 inches across beds once a year, ideally in autumn or early spring. You don’t need to dig it in — worms and weather will do that for you, and leaving the soil undisturbed does more good than turning it over.
- Use it as mulch around established plants.
- Mix it into potting soil — though for seed starting use a milder mix; strong compost can be too rich for seedlings.
One caution worth knowing: compost that isn’t fully finished can temporarily tie up nitrogen as it continues breaking down in your soil. If in doubt, give it another month.
How Finished Compost Supports Soil and Plants Naturally
Congratulations on creating your finished compost! This nutrient-dense garden gold not only recycles waste but also serves as a powerhouse for nurturing robust plant growth. Here are some ways compost enriches your soil and plants:
1. Enhances Soil Life
Compost is teeming with beneficial microorganisms. When applied to your garden, these microbes interact with and nourish the existing soil food web, enhancing the overall health and vitality of your soil ecosystem. The increased microbial activity means better nutrient uptake and healthier plants naturally.
2. Improves Soil Structure
Adding compost to your soil improves its structure by increasing aeration and water retention capabilities. The organic matter binds soils, creating a fluffy texture that allows root systems to penetrate more easily. This leads to stronger, deeper roots and greater plant resilience.
3. Boosts Soil Fertility Naturally
Compost enhances soil fertility by slowly releasing essential nutrients such as nitrogen, phosphorus, and potassium, which are vital for plant growth. Unlike synthetic fertilizers, compost provides a balanced nutrient mix and helps reduce the risk of nutrient runoff.
4. Builds Soil Resilience
Healthy, compost-enriched soil is more resilient to pests and diseases. The diverse mix of microbes helps suppress soil-borne pathogens naturally and supports plant defenses. Moreover, compost can help buffer soil against environmental stresses like drought, ensuring a persistent garden yield.
Building Fertile Soil with Composting
Embracing composting in your gardening practice is a rewarding way to recycle waste naturally while creating a nurturing space for your plants to thrive. As you embark on this sustainable journey, remember that each small effort contributes significantly to a healthier planet.
Whether you’re a backyard homesteader or a balcony gardener, composting is a simple act that creates lasting change—for your soil and the world around you.
Ready to start composting and empower your garden’s resilience? Gather your kitchen scraps, grab your garden fork, and let Mother Nature take charge. If you found this guide helpful, share it with fellow gardening enthusiasts eager to make a positive impact!
Sources
- NC State Extension. Composting on Organic Farms — thermophilic temperature range, the 131 °F pathogen threshold, 145 °F for weed seeds, and the 25:1–40:1 C:N ratio.
- US Environmental Protection Agency. Advancing Sustainable Materials Management: Facts and Figures — food and yard trimmings as a share of municipal solid waste.